SOLAR WATER HEATER
Before we designed our tiny houses, the class constructed devices that used solar energy to heat water to better understand heating and usage of solar energy. We could use plastic tubing, copper tubing, insulation, aluminum foil, cardboard, lenses, plastic sheeting, and a water container to heat as much or as little water we wanted.
Each group started by identifying what materials they would be using and made a sketch or blueprint.
Materials:
Plastic Tubing= water exit/ entrance
Copper Tubing= for convection and conduction purposes
Insulation/Plastic Sheeting=holds in heat
Aluminum Foil= used for reflecting
Cardboard= holds heater together
Lenses= magnifies light through concentration
Laws of Thermodynamics:
0th Law= explains temperature, if two systems are in thermal equilibrium with a third system, then they are in thermal equilibrium with each other
(if A=B and B=C, then A=C)
1st Law= Conservation of Energy, energy is not created nor destroyed, but it is transferred from one form to another
2nd Law= energy moves from more ordered to less ordered, everything becomes the same temperature over time
(entropy/disorder increases)
3rd Law= Temperature can never reach absolute zero on Kelvin scale
(heat will always exist)
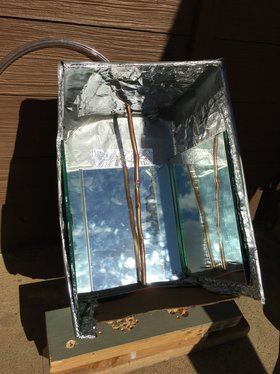
To make our water heater, my group took a pizza box and lined its inside with aluminum foil. A copper pipe went through the middle and had a plastic tube at the top so that water could be poured in. Our original plan, to continuously pour water through the pipe, proved to be impractical as we set it up outside. Water leaked from all connecting pipes and did not stay within the copper. We tried sealing the copper pipe shut at one end with duct tape and clay, but water leaked out anyway. We had less than 5 mL of water to measure after we had completed testing. The water we had finished with went up 8 degrees (Celsius) and had a heat gain of 167.44 Joules.
Before we designed our tiny houses, the class constructed devices that used solar energy to heat water to better understand heating and usage of solar energy. We could use plastic tubing, copper tubing, insulation, aluminum foil, cardboard, lenses, plastic sheeting, and a water container to heat as much or as little water we wanted.
Each group started by identifying what materials they would be using and made a sketch or blueprint.
Materials:
Plastic Tubing= water exit/ entrance
Copper Tubing= for convection and conduction purposes
Insulation/Plastic Sheeting=holds in heat
Aluminum Foil= used for reflecting
Cardboard= holds heater together
Lenses= magnifies light through concentration
Laws of Thermodynamics:
0th Law= explains temperature, if two systems are in thermal equilibrium with a third system, then they are in thermal equilibrium with each other
(if A=B and B=C, then A=C)
1st Law= Conservation of Energy, energy is not created nor destroyed, but it is transferred from one form to another
2nd Law= energy moves from more ordered to less ordered, everything becomes the same temperature over time
(entropy/disorder increases)
3rd Law= Temperature can never reach absolute zero on Kelvin scale
(heat will always exist)
To make our water heater, my group took a pizza box and lined its inside with aluminum foil. A copper pipe went through the middle and had a plastic tube at the top so that water could be poured in. Our original plan, to continuously pour water through the pipe, proved to be impractical as we set it up outside. Water leaked from all connecting pipes and did not stay within the copper. We tried sealing the copper pipe shut at one end with duct tape and clay, but water leaked out anyway. We had less than 5 mL of water to measure after we had completed testing. The water we had finished with went up 8 degrees (Celsius) and had a heat gain of 167.44 Joules.
|
|
DAYLIGHTING MODEL
Using daylighting techniques, we experimented with ways to light up our model tiny house using natural light.
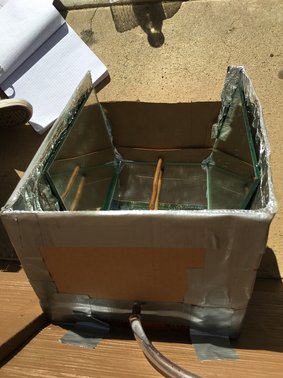
We designed a small model that we would build out of cardboard and aluminum foil. While building it, we found that it was more difficult than we had anticipated and had to adapt to a few last-minute changes, such as the lack of space for the hallway and a few additional windows.
Techniques:
Solar Tubes= tubes in the ceiling that distribute natural light through reflecting it internally
Light Shelves= horizontal surface to reflect light onto the ceiling, then onto the floor
Clerestory Window= short window close to ceiling that lets light in by reflecting light onto the opposite wall and then onto the floor
Skylight= glass "window" in ceiling that lets direct light in
South-Facing Windows= lets in sunlight during winter
Light-Colored Walls= reflects light
Dark-Colored Walls= absorbs heat
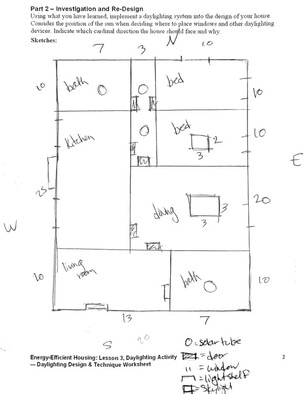
The following image is of our original blueprint.
Using daylighting techniques, we experimented with ways to light up our model tiny house using natural light.
We designed a small model that we would build out of cardboard and aluminum foil. While building it, we found that it was more difficult than we had anticipated and had to adapt to a few last-minute changes, such as the lack of space for the hallway and a few additional windows.
Techniques:
Solar Tubes= tubes in the ceiling that distribute natural light through reflecting it internally
Light Shelves= horizontal surface to reflect light onto the ceiling, then onto the floor
Clerestory Window= short window close to ceiling that lets light in by reflecting light onto the opposite wall and then onto the floor
Skylight= glass "window" in ceiling that lets direct light in
South-Facing Windows= lets in sunlight during winter
Light-Colored Walls= reflects light
Dark-Colored Walls= absorbs heat
The following image is of our original blueprint.
HEAT TESTING LAB
The class split into two groups (one for building materials and one for insulation materials) and designed an experiment to see how their materials would respond to heat.
The group that tested the building materials got together to design the experiment before breaking off into smaller groups.
Our objective was to test to see how certain materials reacted to heat (radiation, conductivity, absorption, reflection) . The independent variable was the material, while the dependent variable was the temperature. The distance from the light source, angle, color or composition, exposure time, and type of heat source were the controlled variables.
Terms:
Specific Heat Capacity= amount of heat to raise the temperature of a material (if the temp. increases quickly, the mass has a low specific heat capacity, and when the temp. increases slowly, it has a high specific heat capacity)
Radiation= heat transfer using rays or waves (no medium needed)
Conduction= heating through a material (solid)
Convection= heat transfer though fluid (liquid or gas)
Insulation= do not conduct heat well, traps heat in
The Experiment:
1. Place the material 40 cm underneath a 125-watt heat lamp.
2. Measure the initial temperature of the material at the center of the surface facing upwards, towards the lamp.
3. Turn lamp on.
4. Measure the temperature of the material (at the center of the surface) after 5 minutes.
5. Measure the temperature of the material in the same spot after an additional 5 minutes (10 minutes from the start).
| materialsheatlab-reemaheydari.pdf |
| materials_heat_lab_data_6_7th_2017_-_sheet1.pdf |
TINY HOUSE
This was the main project that we had been building up to. The driving question was: How can we design a home that is comfortable in all conditions without the use of electricity? With our new knowledge of daylighting techniques and thermodynamics, each team began to design a home that would be as energy efficient as possible. The home would preferably be cost-efficient as well, although there was no set budget assigned. We had to find a location and make interior and exterior decisions to suit the house's environment. The different materials would have to have a justification as to how it would work in the setting of the residence. Like a real-life situation, we had to provide blueprints and exact measurements, a presentation, and a materials/price list.
This was the main project that we had been building up to. The driving question was: How can we design a home that is comfortable in all conditions without the use of electricity? With our new knowledge of daylighting techniques and thermodynamics, each team began to design a home that would be as energy efficient as possible. The home would preferably be cost-efficient as well, although there was no set budget assigned. We had to find a location and make interior and exterior decisions to suit the house's environment. The different materials would have to have a justification as to how it would work in the setting of the residence. Like a real-life situation, we had to provide blueprints and exact measurements, a presentation, and a materials/price list.
| tiny_house_materials_-_sheet1.pdf |
WIND TURBINE DESIGNS
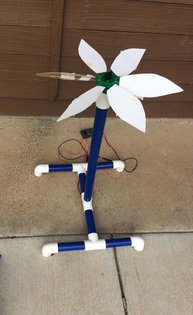
Our group designed multiple different fan designs to see how they responded to different wind settings. We used a small fan's first two settings to simulate low and medium winds, and used a leafblower for high. We tested each of the sets of fan blades on a horizontal and vertical axis.
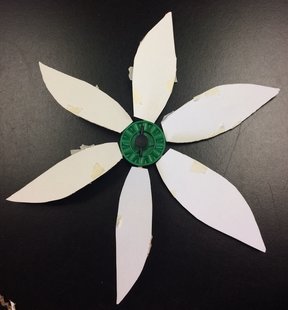
Each of the blade sets had 6 wings, but with different size, shape, and/or material.
The first set we tested used cardboard and cardstock wings. They were rectangular, 6 inches by 3 inches.
The second set was made from cardstock and was shaped like a petal, it was 7.5 inches from the tip to the bottom of each blade.
The third set was made of cardstock, 7 inches long.
The fourth set was made of cardboard, 6 inches by 3 inches.
The fifth set was made of cardboard, 5 inches by 1.5 inches.
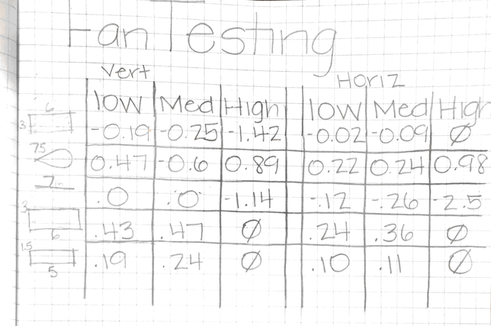
We found that the petal-shaped blades (set 2) worked best in all of the 3 conditions we tested.
The following images are of the petal-shaped blades and data we collected from the various sets.
Our group designed multiple different fan designs to see how they responded to different wind settings. We used a small fan's first two settings to simulate low and medium winds, and used a leafblower for high. We tested each of the sets of fan blades on a horizontal and vertical axis.
Each of the blade sets had 6 wings, but with different size, shape, and/or material.
The first set we tested used cardboard and cardstock wings. They were rectangular, 6 inches by 3 inches.
The second set was made from cardstock and was shaped like a petal, it was 7.5 inches from the tip to the bottom of each blade.
The third set was made of cardstock, 7 inches long.
The fourth set was made of cardboard, 6 inches by 3 inches.
The fifth set was made of cardboard, 5 inches by 1.5 inches.
We found that the petal-shaped blades (set 2) worked best in all of the 3 conditions we tested.
The following images are of the petal-shaped blades and data we collected from the various sets.
|
|
ENERGY EFFICIENCY
REFLECTION
The group split up so that we would each be responsible for a separate component and didn't check in as often as we should've. My partner and I took a while to get started on the materials list, and fell behind. We did well in identifying what needed to be done, but lacked when practice time came around. On the day of the presentation, our group had a few things missing due to communication issues. While we struggled to make group decisions, we succeeded in adapting to last-minute changes.
I worked on this project with Kelsey McIvor, Bretton Simpson, and Josh Franks.
